[How To] Creating Boot Animations for Android Systems (Basic)

JaeKar99

Premium Member
Premium Member
Developer
Joined
Jan 7, 2012
Messages
244
Reaction score
95
I have seen requests for a tutorial or some instructions regarding making/building boot animations.. This is a beginning and is in a rough stage of the editing process.. It may take some time to get all the pieces assembled and all the contingencies covered.

Thanks to all the themers, devs, and mods I have worked with and their support in learning and using my boots in their work..
gunnermike53
nitsuj17
sbrissen
GrainOsand
Adrynalyne
Vache - - - and a bunch more that I cannot think of right now

You will need some tools – All that are listed here are free or you already have them:

First off to get your raw material (videos) you will need to get YouTube Downloader.
This will give you the option to pull down videos you may choose to use for your image sources.

There is also the option to build your own animation - Blender is a great tool to make animation sequences. I will not be doing any teaching on Blender – there are detailed videos on Youtube.com

Next you will need Free Video to jpg Converter.
This is the best tool (free) to extract individual images from the video that you have.

Some form of picture or image editor will also be needed: MS paint, or Photoshop works well - Gimp is free.

Faststone Image Viewer. - This tool is used to batch change files. This is a nice program because it can rename, rotate, or completely convert whole batches of image files for you.

Photoscape - is another that will build animated gifs for you and will make batch changes to images.

You may also need a video editing program that is capable of putting captions on the video sequence or can edit longer sequences to shorter or cut and piece them together. Any should work fine. I use MSLive Movie Maker.. I am sure that there are many more available.

You can also get GifSplitter program to pull animated gif files apart into the respective images then those can be packed into a boot..

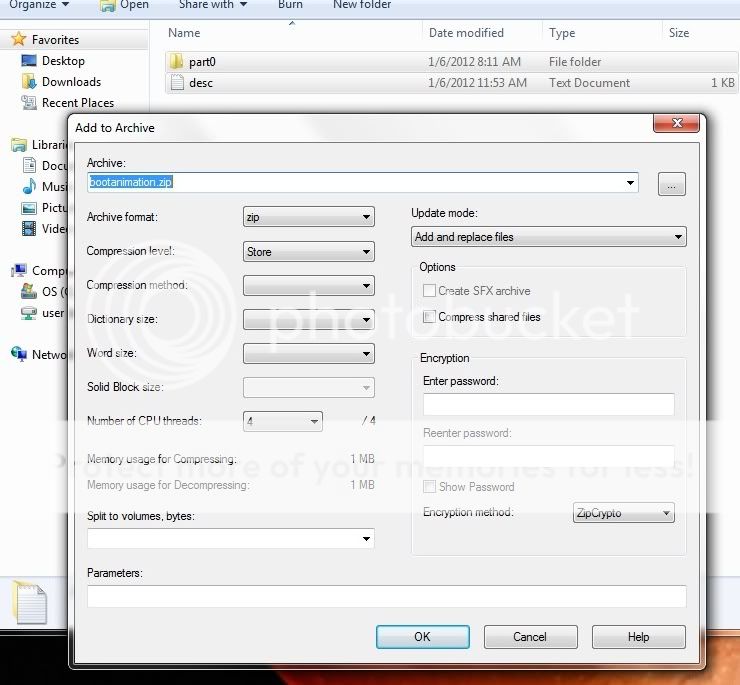
You will also need a file zip utility. 7zip works best for me:
This will be needed to package the image files so that they are playable by the device.

You will also need program to edit the desc.txt file.. best program out there is Notepad ++. I do not use any other program so if there is another out there I have not used it. Do not use MSWord or other word processor. It will corrupt the file in a fashion that makes the boot not play.


Once you have your tools you move on to the next step...
 
OP
JaeKar99

JaeKar99

Premium Member
Premium Member
Developer
Joined
Jan 7, 2012
Messages
244
Reaction score
95
Patience:

Step 1:
Download and install all the programs that are listed above.. then go hunting for the video images that you will want to use. Once you find the vid you want to turn into a boot animation you download it using the YouTube downloader.

Step 2:
Once you have the file you can use the Video to jpg Converter to break it into the number of images you desire; or you can put it into your video editor to adjust the length or add a caption.. Keep in mind that when importing process lowers the overall quality of the end image output. It is not really noticeable on a phone but makes many boots on a tablet it can appear grainy.

Things to consider; If you are cutting up a HD video each image will be very large in memory size and you may have to reduce the number of images that you have.. A really good number is ~100 to 200. Sometimes a 100 image sequence will 20+ megs in size. There is a trade off with larger numbers of images.. big images means really clear images, awesome colors and great resolution… but – slow load times, animations may start and stop, blackouts or freeze ups. To ensure smooth image flow and good load times I have always tried to keep all my animations under 7 megs. The absolute max is not established but if you are trying to push a 20 meg boot animation it will likely black out. . But this all depends on image color and density, black is always better.

Step 3:
Once you have your images procured you can edit them in batches: use Faststone to change the numbering in batches.. Android OS is nice enough that it will follow the established sequence and will keep playing even if you leave a number out.. You can also do batch changes in file format from jpg to png. This program is nice for this process because it does not degrade the integrity of the image.

I recommend any image editing be done in batches as well.. I use Microsoft Picture editor to select all the images at once and then crop as I need to.. Warning: if you crop either left or right side of the image the corresponding crop has to occur on the opposite side. The same applies to the top and bottom of the image. If you cut 10 pixels off the top you have to cut 10 off the bottom. If the crop is not symmetrical your images will play skewed and you it will look like your boot animation shifted diagonally to one side or the other.. or will not play at all.

When colorizing using Gimp or other graphics software to colorize if there are inherent (undesired) artifacts hidden in the images colorizing or inverting will make the artifacts more pronounced and may make some images unusable.

Step 4:
When you feel that all your images are completely edited to your liking you can start to assemble the images into the boot animation. The bootanimation.zip file has to contain certain structures: Image Folders and the desc.txt file.
The folders that contain the images; each folder labeled so that when told to play it plays the specific folder first. Then a desc.txt file. This file is the commander for the os/kernel. (more on that later)

If you want to break up the images into different folders this is the time to do it. One folder can be made to be played one time where the next may loop over and over again.. There is no current limit on the number of images in any of the folders. Early phones had caps of about one meg per folder. I have not found this to be the case with any Android system after 2.1.

Folder labeling – really does not matter as long as the desc.txt file contains the direction to that specific folder in it. Almost all boot builders will use ‘part0’, ‘part1’, ‘part2’… etc. as respective names for the folders. It is usually helpful to set up a working folder where your images are located and then drop your images there for editing.. you can then change the name to the desired folder in the boot sequence.

Step 5:
The desc.txt file: This is where most errors take place if they are going to happen to prevent a boot from playing first time. Using Notepad ++ open an existing file from a boot that you have already.. you will notice that there a few lines of code :
Line 1: The first two numbers on line one are the resolution and the third is the frames per second to play the image sequence
Line 2: Left blank. Some boot builders put a blank line in here for unknown reasons. I have found that it is not needed but you can keep it in if you choose.
Line 3: p = play, 1 = number of times to play, 0 = pause in the number of frames/second, part0 = the folder containing the image files chosen for that section. Note: spelling must match identically with the folder name.
Line 4: p = play, 0 = (0 infinite) number of times to play, 0 = pause in the number of frames/second, part1 = the folder containing the image files chosen for that section. Note: spelling must match identically with the folder name.
Line 5: ALWAYS LEFT OPEN. If you do not have an open last line the line preceding it will NOT play work (Black out) and the boot will stop playing.. or will not play at all.

Example 1:
BuildImage1.jpg


The desc.txt file for a boot animation that will play the first folder one time then loop the second folder:
1 720 1280 35
2
3 p 1 0 part0
4 p 0 0 part1
5

Note: The number of times that the a folder plays has a maximum.. currently I cannot get it to play more than 7 times before it moves to the next folder, regardless of the number of plays defined in the desc.txt file.


Step 6:
When you have your folders and your desc.txt file assembled you should move all of that to what I call a working folder and then select them using 7zip.. then zip them up… IMPORTANT!!! DO NOT compress the files.. they are to be ‘stored’ – to a file called ‘bootanimation.zip’.. if it is compressed in any fashion it will not work.. You also cannot open the archive and then drag and drop files to it. You must compile the file each time from the folder(s) and the desc.txt file.. and zip it. If you opt to go the drag n drop route it will not work.

Zipping up Example:
BuildImage2.jpg


You have assembled your first boot animation.

Testing: Copy the bootanimation.zip file to your sd card and then using your file explorer of choice move or copy-paste to data/local (that way it will not copy over your permanent boot) you may need to set permissions rw-r-r..

Reboot and wait.

These are not flash ready zip files. Flashing them may cause a boot loop or a failed install..

Expect many attempts that do not work the first time.... do not give up.

Next……
 
OP
JaeKar99

JaeKar99

Premium Member
Premium Member
Developer
Joined
Jan 7, 2012
Messages
244
Reaction score
95
Trouble shooting:
I set the images up in HD but the boot animation is washed out: There are a few devices out there that will actually play a HD boot animation (ex. HP Touchpad). Many devices will not display a boot animation in HD. The HD drivers and animation components are loading in the background and are not available for boot animation displays. There are ways around this by using image stock that has pronounced bright colors (primary colors are best for this). Many people have be very disappointed when they invest considerable time in up scaling images to have them be washed out and dull during the boot..

Boot plays but is bent/skewed to one side: The images were edited incorrectly when cropped. The crop was not symmetrical. This will also happen if you compress the jpg images too much in a You will need to redo the images from the video sequence then crop and repack.

Boot starts to play then stops and goes to black: make sure that the folder names are the same between the desc.txt file. There may not be a blank line at the end of the desc.txt file. The file sizes may be too big and the files cannot be played. Boots with image files greater than 500K per image will lock up on some devices. You may have to run the video through a converter to get it to a resolution low enough to run on the device without locking it up, bogging down or failing to loop. This is more likely to happen with (HD files); 720p and 1080p files that are directly converted to jpgs and then run as the boot animation.. I do not know why this happens but by running the video through like Windows Live Movie Maker it will allow it to work.. This does not happen to all videos.. If it happens I suggest converting the wmv to an avi and then reprocessing the video to jpgs.

Boot plays but only loops the first folder: the number after the ‘p’ in the second line should be a ‘1’ not a ‘0’.

The boot plays very slow and cannot play all the way through before the device is done booting: Image sizes are too big, or the fps in the first line is too low and you need to raise the number. Reduce the size of the files (compression) – be cautious of this, it has been known to corrupt the images and will cause them to skew/bend or freeze up upon play.

Boot will play then flash and start over – or will loop (as designed) with flashes: Windows image editor side effect. When you are viewing files in the windows picture viewer it will place a hidden file in the folder usually thumbs.db or imagethumb.db or other *.db file. This will cause the boot to flash white as the player tries to play the image sequence. This file must be removed from the folder for your boot to work right – when it is in the ‘stored’ format you can right click then select 7zip in the dropdown go over to open archive and then examine the contents of each folder if you see a *.db file – delete it. That will correct the problem.

Permissions: Get just a black screen or a landscaped “Android” logo.. you will need to ensure that your permissions for the bootanimation.zip file are set at: rw-r-r
 
OP
JaeKar99

JaeKar99

Premium Member
Premium Member
Developer
Joined
Jan 7, 2012
Messages
244
Reaction score
95
Scripted Zip Install Files for Flashing a Boot Animation

You will need two programs for editing these files – you more than likely already have them : 7zip and Notepad++

First off kang a known version of the zip installer files.. download one of mine - open invitation to take what you need..
Once you have the file downloaded. Extract all the files to a folder of your liking.

The most common file structure: (two sets of folders)
META-INF/com/google/android
system/media/
Another set of folders may also be:
data/local – in the place of system/media

Note: you may also find other files and folders in there – leave them be.. they are required for the correct install..

In the first set of folders you will find a file called, “updater-script”
This is the script file that will mount correct memory block and copy the necessary files from the zip file to the correct location in the phone.. Depending on the ROM and the Clockwork Mod version you are using it may require different scripts.. There are a lot out there.. I have lableled mine to indicate what type of ROM they are scripted to install on .. Nex – Gnexus , 403 - 4.0.3 ROM Gnexus, mtd – CM7, Edify - CWM 3.x and 4.x.. the list goes on.. just take one of mine that is known to work.

Examples:
Example 1: - mounts for 4.0.2 and will install to system/media.. This will also work with CM7.. Will not work with Edify installs..
Code:
[I]show_progress(1.000000, 0);[/I]
[I]ui_print("Mounting /system...");[/I]
[I]set_progress(0.200000);[/I]
[I]set_progress(0.60000);[/I]
[I]run_program("/sbin/busybox", "mount", "/system");[/I]
[I]package_extract_dir("system", "/system");[/I]
[I]unmount("/system");[/I]
[I]ui_print("");[/I]
[I]ui_print("");[/I]
[I]ui_print("Complete. Boot Animation Installed....");[/I]
[I]show_progress(1.000000, 0);[/I]
Example 2: - mounts for 4.0.3 and installs to data/local
Code:
[I]ui_print("");[/I]
[I]show_progress(0.500000, 0);[/I]
[I]mount("ext4", "EMMC", "/dev/block/platform/omap/omap_hsmmc.0/by-name/data", "/data");[/I]
[I]ui_print(" ");[/I]
[I]ui_print(" ");[/I]
[I]package_extract_dir("data", "/data");show_progress(0.100000, 0);[/I]
[I]unmount("/data");[/I]
If you know that this is the file that will work with the desired ROM just continue to use this format and only modify or remove the lines of code that start with “ui_print("");” Text may be inserted between the quotation marks only..

Neat to look at but don’t tinker too much.. you can cause major issues if you try commands that you are unfamiliar with..

In the system/media or data/local folders you will find my bootanimation.zip file.. remove it..
Delete or use as an example, or just kang it - its cool..
Place your bootanimation.zip file that you have worked so hard on in that folder then back out so that you can see the :

META-INF/com/google/android
system/media/ - or - data/local folders..

Highlight both the folders and then right click using 7zip and zip (store) these folders – just like you did making the boot animation zip file.. give it a name is a good indicator of what you want to call your boot..
C:\Users\JASON-~1\AppData\Local\Temp\msohtmlclip1\01\clip_image002.jpg

Ding – your boot will appearing below the folders..
Transfer to your newly made boot animation zip installer to your sd card – boot into recovery - install zip from sdcard..

Profit..
 

DF Smod

Silver Member
Joined
Apr 23, 2010
Messages
11,341
Reaction score
88
Awesome write up, thanks for posting it up!!!
 

guidot

Developer Relations
Staff member
Premium Member
Joined
Feb 10, 2010
Messages
7,292
Reaction score
271
Location
Massachusetts
Excellent write up!

No wonder your ani's look so good!

:wink-b:

Sent from my DROID3 using Tapatalk
 

ZachW

New Member
Joined
Apr 28, 2012
Messages
2
Reaction score
0
Hello, im working on my first animation! Ive made splash screens and custom icons for home and stats bar but for some reason I cant work this out. Heres a link to what I have... I dont see what the issue is maybe you can give me a hand. bootanimation.zip - *********** - online file sharing and storage - download

Thanks!
 
OP
JaeKar99

JaeKar99

Premium Member
Premium Member
Developer
Joined
Jan 7, 2012
Messages
244
Reaction score
95
Hello, im working on my first animation! Ive made splash screens and custom icons for home and stats bar but for some reason I cant work this out. Heres a link to what I have... I dont see what the issue is maybe you can give me a hand. bootanimation.zip - *********** - online file sharing and storage - download

Thanks!

ZachW,

Found your issue.. the desc.txt file needs to have a blank line at the end (line 4 for you) - must be empty.

That should solve the issue.

Jae
 

ZachW

New Member
Joined
Apr 28, 2012
Messages
2
Reaction score
0
ZachW,

Found your issue.. the desc.txt file needs to have a blank line at the end (line 4 for you) - must be empty.

That should solve the issue.

Jae


WOW... I feel like an idiot... All I needed to do was press enter twice... Thanks for the prompt reply! Wow.. Good post. I only used about 1/4th of it because ive ripped apart other custom boots but didnt notice the blank at line 4! You are the man!
 
OP
JaeKar99

JaeKar99

Premium Member
Premium Member
Developer
Joined
Jan 7, 2012
Messages
244
Reaction score
95
Don't feel bad.. I wasted 3 days of my life on that issue and was ready to throw in the towel...

It is always the little things. (devil in the details) :icon_ devil:
 

DrTweak

New Member
Joined
Nov 21, 2012
Messages
1
Reaction score
0
I would like to add a Disaster recovery for people who may mess up like me and become stuck with an infinite boot loop.

First download Android SDK Android SDK | Android Developers

Once installed find the drivers for your phone. In my case a Droid X -

64 Bit - Motorola Handset USB Driver for Windows (64-bit) download for Windows Mobile PocketPC / Linux / Symbian / Windows Mobile Smartphone / Java / Android - Softpedia
32 Bit - Motorola Handset USB Driver for Windows (32-bit) download for Windows Mobile PocketPC / Linux / Symbian / Windows Mobile Smartphone / Java / Android - Softpedia

If you don't have a Droid X just google "Phone Name" adb drivers

Once the drivers are installed turn off your phone and press Camera + Power. Once you see the droid splash release the power but hold the camera still. After 5 seconds release the camera button. Again this will vary depending on your phone.

Volume Up/Volume Down = Navigate
Camera = Select/Enter
Power = Back

Plug your phone into your computer via USB and your computer should detect the hardware and install the drivers. Use the volume down button until Storage and Mounts is selected then press Camera or what ever button is your Enter button. Highlight Mount System and select enter to mount it. If it says Unmount then it is already mounted.

Now open up a command prompt on your PC. Type

cd c:\program files (x86)\android\android-sdk\platform-tools

for 64 bit version of windows and

cd c:\program files\android\android-sdk\platform-tools

for 32 bit

For XP use " " around program files like so

cd c:\"program files"\android\android-sdk\platform-tools

Now type adb devices and it should list a device. If it does not make sure you are properly in clockwork recovery (Does not matter what screen) and that the phone is connected to the USB and proper drivers installed. It will not list the phone name but a serial like number.

Then type adb shell

this will give you navigation though the phones storage. Then type cd system/media

then type

rm bootanimation.zip bootanimation1.zip

to rename the boot animation folder and disabling the boot animation all together. You can also type

rm bootanimation.zip

and it will remove it completely vs renaming it. Once you have done that go to the main screen on clockwork recovery by pressing home and then highligh reboot system now and press the select button on the phone and volia!

Next time Don't be like me. Follow the instruction to the T and put the bootanimation in the system/local and not the system/media
 

teddyearp

Senior Member
Joined
Jan 13, 2010
Messages
1,816
Reaction score
12
Location
Pinetop, AZ
Current Phone Model
Motorola Razr 5g Rooted
Next time Don't be like me. Follow the instruction to the T and put the bootanimation in the data/local and not the system/media

Like the OP said, the devil's in the details. And I know I have necro posted this thread, but in case someone comes along later, I had to fix the mistake in your post (in red).

Nice thread, and very well done.
 
Top